Introduction
In my last post, I began discussing the importance of having a robust and cost-effective backup solution. With data becoming more valuable than ever, finding the right balance between efficiency, reliability, and affordability is crucial. Now, it’s time to dive deeper into my thought process and the specific steps I took to build a refined backup system that ticks all these boxes.
In this post, I’ll walk you through the development of my new backup plan, which includes leveraging a pre-built NAS and affordable hardware to create an efficient, space-conscious solution. I’ll also introduce an upgraded version of the gbackup utility, designed to make backing up and restoring data effortless. Let’s get started!
Why
Before deciding to build my own NAS from individual PC components, I considered purchasing a pre-built NAS from a third-party provider. However, several factors made me reconsider.
First, I didn’t want to be confined to a proprietary environment — I wanted full control to install whatever I needed on my system.
Second, most pre-built NAS solutions come with a host of unnecessary features that I simply don’t need, all at a hefty price tag.
Lastly, where’s the fun in just buying a box and calling it a day? So, I opted for the DIY route, building and configuring my own NAS from the ground up.
So the main goal of the NAS is to:
- Backup everything inside Proxmox
- Backup my worklatop
- Backup my two Pi’s
- Be able to backup more stuff in the future
NAS Components
Inspired by Michael Stapelberg’s blog post.
It’s worth mentioning that there are a few optional components to consider, such as:
- CPU Cooler
- Case Fan
I chose to invest in these optional components to ensure a longer-lasting and more efficient system. By prioritizing longevity, I can enhance performance and reduce the risk of overheating, ultimately contributing to the overall reliability of my NAS.
NAS Configuration
To configure my NAS, I followed these steps:
- Installed Debian 12 (No Desktop Environment)
- I opted for a minimal installation without a Desktop Environment (DE) to keep the system lightweight and focused on performance
- Set Up Static IP Address
- To ensure consistent network access, I configured a static IP address by editing the
/etc/network/interfacesfile
- Setup Wake on Lan
- Enter BIOS -> Advanced -> ACPI Configuration -> PCI Devices Power On -> Enable
- Enter BIOS -> Advanced -> Onboard Devices Configuration -> Restore on AC/Power Loss
- This setting ensures the machine turns back on after a power loss. Without it, WOL might not work after a power loss
- Verify if interface has WoL Onboard
sudo ethtool <interface> | grep -i wake- Test the WoL from another computer in the LAN
wakeonlan <mac of NAS>
- Configure ZFS
- Install zfs tools
- Create zfs Pool
sudo zpool create -f -o ashift=12 brun0nas1 /dev/disk/by-id/ata-KINGSTON_SA400S37240G_50026B76861689C2 /dev/disk/by-id/ata-KINGSTON_SV300S37A240G_50026B766A04AC5E
- Create two datasets
sudo zfs create brun0nas1/backupExternal && sudo zfs create brun0nas1/backupProxmox
- Activate autotrim
sudo zpool set autotrim=on brun0nas1
- Activate zfs scrub
sudo systemctl enable --now zfs-scrub@brun0nas1.timer
\# /etc/systemd/system/zfs-scrub@brun0nas1.timer

[Unit]
Description=Monthly zpool scrub on brun0nas1

[Timer]
OnCalendar=monthly
AccuracySec=1h
Persistent=true

[Service]
ExecStart=/usr/bin/zpool scrub brun0nas1

[Install]
WantedBy=multi-user.target
- Configure Proxmox Backup Server (PBS)
wget https://enterprise.proxmox.com/debian/proxmox-release-bookworm.gpg -O /etc/apt/trusted.gpg.d/proxmox-release-bookworm.gpg

\# added this to /etc/apt/sources.list
deb http://download.proxmox.com/debian/pbs bookworm pbs-no-subscription

s apt update
s apt install proxmox-backup-server
- Configure mount point (backupExternal was optional here, I added but it is not used in PBS)
mkdir -p /mnt/datastore/backupExternal
mkdir -p /mnt/datastore/backupProxmox

s zfs set mountpoint=/mnt/datastore/backupProxmox brun0nas1/backupProxmox
s zfs set mountpoint=/mnt/datastore/backupProxmox brun0nas1/backupExternal
- Verify mount point
zfs list

NAME                       USED  AVAIL  REFER  MOUNTPOINT
brun0nas1                 1.02M   430G    96K  /brun0nas1
brun0nas1/backupExternal    96K   430G    96K  /mnt/datastore/backupExternal
brun0nas1/backupProxmox     96K   430G    96K  /mnt/datastore/backupProxmox
- Add mount points into PBS Datastore
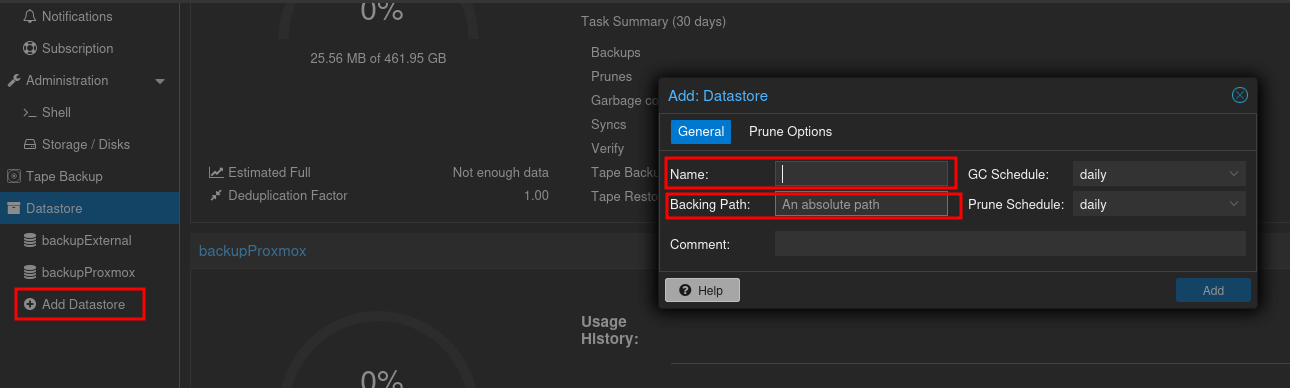
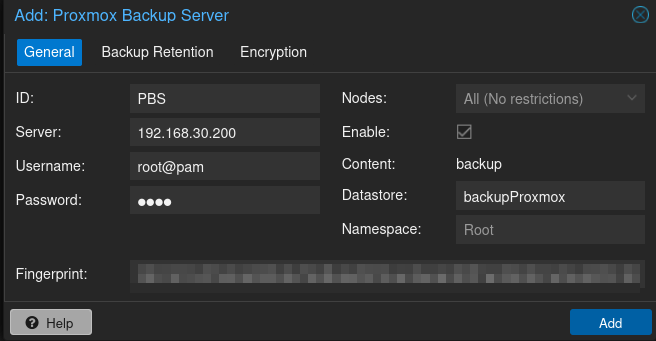
- Add PBS to Proxmox
- Go to Proxmox and Datacenter -> Storage -> Add Proxmox Backup Server
- The Fingerprint needs to be from PBS so go to Dashboard and chose
Show Fingerprint
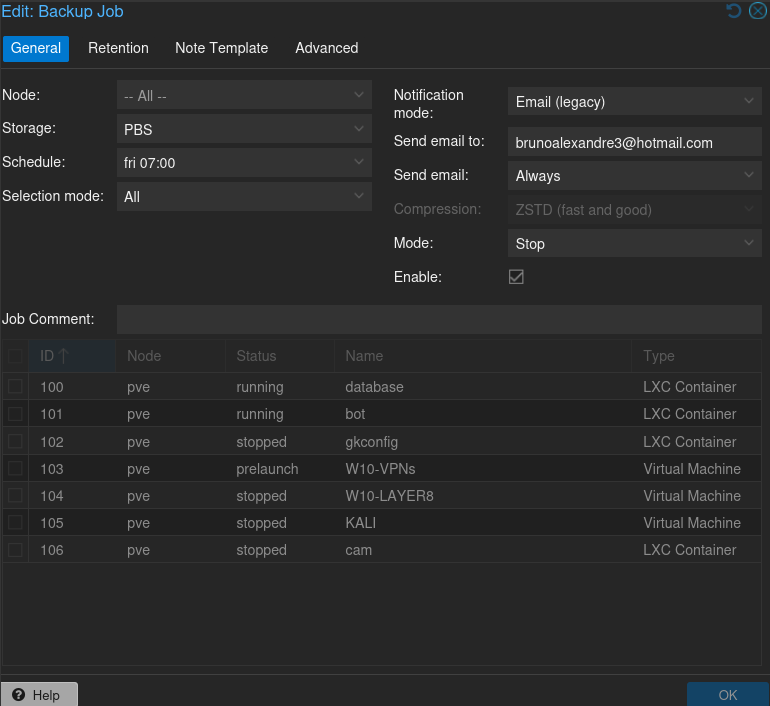
- Create the backup format
- I choosed to perform one backup every friday at 13 and keep the last 2
Gbackupv2
Backup Information
- External Hard Drive Setup
- The external hard drive, mounted at
/mnt/external, is plugged into Proxmox. - Proxmox shares this drive across the local network using Samba, making it accessible to other devices.
- Gbackup Configuration
- Gbackup, running on
pinute(a Raspberry Pi dedicated to this task), has SSH access to the NAS and can also access the/mnt/externalSamba share.
Backup workflow
- Scheduled Incremental Backup (Every Friday at 1 PM)
The following steps outline how the incremental backup process occurs each Friday:
12:50 PM:
Gbackup sends a Wake-on-LAN (WoL) signal to power on the NAS

1:00 PM:
Proxmox Backup Server (PBS) performs an incremental backup of Proxmox virtual machines (VMs) and containers, saving the data to /backupProxmox
Gbackup uses the Proxmox API to check the status and results of the Proxmox backups for the current day

After PBS Backup Completion:
Gbackup backs up important directories from gokrazy, worklatop, pinute, ...
These are backed up to the external hard drive mounted at /mnt/external

Mirror Backup to NAS:
Gbackup then copies the contents of /mnt/external (which includes the aforementioned directories) to the NAS under /backupExternal

Shutdown NAS:
Once the backup process is complete, Gbackup powers off the NAS to conserve energy
Final backup structure
External Drive (
/mnt/external) contains backups of:- Gokrazy perm partition
- Work laptop files
- Pinute-specific files
Proxmox Backup Server (
/backupProxmox):- Stores incremental backups of VMs and LXC containers
NAS:
- Contains both the Proxmox backups (
/backupProxmox) and the external hard drive’s backup (/backupExternal)
- Contains both the Proxmox backups (
Obs: In the future, a second external hard drive will be connected to Pinute. Once a month, Gbackup will create a tarball of the backupProxmox and backupExternal folders on the NAS.
These compressed backups will be saved to the secondary hard drive as an additional layer of redundancy.

Disaster Recovery
If
/mnt/externalfails - info resides insideNAS&Second external hard drive- Buy a new external HDD, plugg into Proxmox, rsync backup from
NASorSecond external hard drive
- Buy a new external HDD, plugg into Proxmox, rsync backup from
If
NASfails - VMs and LXC resides insideSecond external hard drive- Reinstall Debian and PBS, setup PBS with same storage as before, import backup into that storage
- OR
- Reinstall Debian and PBS, setup PBS with the same storage as before and perform a VM/LXC backup
If
Proxmoxfails - info resides insideNAS,/mnt/external&Second external hard drive- Reinstall Proxmox, import
/mnt/external, add PBS, restore VM’s/LXC
- Reinstall Proxmox, import