Introduction
Cracking passwords at scale requires serious GPU power — and serious money. I quickly realized that building a dedicated machine with multiple GPUs wasn’t just expensive upfront (thanks to hardware and GPU prices), but also a constant drain due to electricity costs. Worst of all, the rig would sit idle most of the time, wasting its potential. So I started looking for a smarter, more flexible setup. That led me to Hashtopolis, a powerful tool for distributed hash cracking; Vast.ai, a platform offering affordable on-demand GPU instances; and Cloudflare Tunnel, which lets me expose my Hashtopolis server securely to the internet — no public IP or port forwarding needed.
In this post, we’ll show you how I integrated all three into a scalable, budget-friendly cracking setup.
The Initial Approach: Simple, but risky
The first plan was to have the Hashtopolis server running inside a Docker container on a VPS, and then use Vast.ai to spawn GPU-powered instances that run the Hashtopolis Python agent.
These agents will connect back to the Hashtopolis server to receive tasks and report results. To enable this connection, we had to expose the Hashtopolis server to the internet - but that brings some security concerns.
Why It Fell Short: Security Concerns
Our initial setup was simple and functional: we had the Hashtopolis server running inside a Docker container on a VPS, and it was accessible via the VPS’s public IP on port 8080. On the Vast.ai side, we configured it to run Hashtopolis Python agents on demand using this prebuilt Docker image, which includes both Hashcat and the agent. This setup worked like a charm — we could spin up agents on Vast.ai and have them instantly connect to the Hashtopolis server, ready to start cracking.
However, there was one major downside: the Hashtopolis web interface was directly exposed to the internet. Yes, it does have a login form, is password-protected, and even supports multi-factor authentication, but that still left the door partially open. For us, that wasn’t ideal — especially when dealing with a potentially sensitive cracking infrastructure. We wanted an extra layer of protection to hide the service completely from public view unless explicitly accessed through a secure channel.
That’s where Cloudflare Tunnel came into play.
The Improved Architecture: Securing the Setup
Knowing the risks of exposing the Hashtopolis server directly to the internet, we started looking into more secure alternatives — and that’s where Cloudflare Tunnel came in. With Cloudflare Tunnel, we can expose our locally running Hashtopolis (inside a Docker container on the VPS) to the internet without opening any ports or exposing the server’s public IP. Instead, all traffic is routed through Cloudflare’s secure edge network.
To add an extra layer of protection, we configured the tunnel to require two custom HTTP headers for any incoming request. This means that even if someone discovers the tunnel URL, they won’t be able to interact with the Hashtopolis server unless they include the correct headers — effectively acting as an API key-style authentication layer before the app’s own login and MFA even come into play. This setup allows only authorized agents to connect to the server securely, giving us the privacy and control we were missing before.
Hands-On: Building the Secure Hashtopolis Cloud Setup
This guide does not cover detailed Hashtopolis installation steps. It assumes you already have a running and functional Hashtopolis server ready to go.
To put our second - and more secure - plan into action, we needed to go through a few setup steps.
Installing Hashtopolis in Docker
To install Hashtopolis inside a Docker container, simply follow the official installation guide here: https://github.com/hashtopolis/server/wiki/Installation. Once the server is up and running, be sure to create a voucher through the Hashtopolis web interface - this voucher will later allow your agents to authenticate and register automatically via the Hashtopolis API.
Also, don’t forget to keep the Docker container running locally on your VPS, as this is the instance that will be exposed through the Cloudflare Tunnel and serve as the central coordinator for all agent activity.
The following is a sample docker-compose.yml file to run the Hashtopolis server locally:
version: '3.7'
services:
  hashtopolis-backend:
    container_name: hashtopolis-backend
    image: hashtopolis/backend:latest
    restart: always
    volumes:
      - hashtopolis:/usr/local/share/hashtopolis:Z
    environment:
      HASHTOPOLIS_DB_USER: $MYSQL_USER
      HASHTOPOLIS_DB_PASS: $MYSQL_PASSWORD
      HASHTOPOLIS_DB_HOST: $HASHTOPOLIS_DB_HOST
      HASHTOPOLIS_DB_DATABASE: $MYSQL_DATABASE
      HASHTOPOLIS_ADMIN_USER: $HASHTOPOLIS_ADMIN_USER
      HASHTOPOLIS_ADMIN_PASSWORD: $HASHTOPOLIS_ADMIN_PASSWORD
      HASHTOPOLIS_APIV2_ENABLE: $HASHTOPOLIS_APIV2_ENABLE
    depends_on:
      - db
    ports:
      - "127.0.0.1:8080:80"
  db:
    container_name: db
    image: mysql:8.0
    restart: always
    volumes:
      - db:/var/lib/mysql
    environment:
      MYSQL_ROOT_PASSWORD: $MYSQL_ROOT_PASS
      MYSQL_DATABASE: $MYSQL_DATABASE
      MYSQL_USER: $MYSQL_USER
      MYSQL_PASSWORD: $MYSQL_PASSWORD
  hashtopolis-frontend:
    container_name: hashtopolis-frontend
    image: hashtopolis/frontend:latest
    environment:
      HASHTOPOLIS_BACKEND_URL: $HASHTOPOLIS_BACKEND_URL
    restart: always
    depends_on:
      - hashtopolis-backend
    ports:
      - "127.0.0.1:4200:80"
volumes:
  db:
  hashtopolis:
Configuring a Secure Cloudflare Tunnel
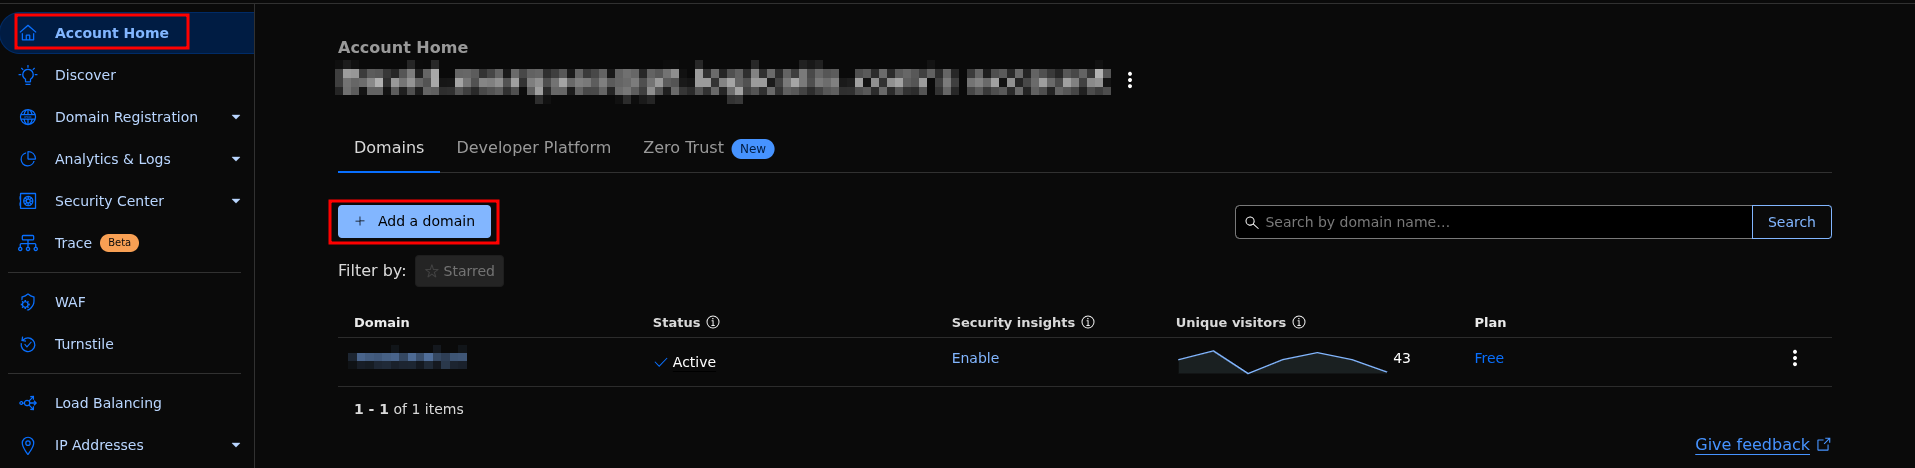
First, we need to purchase a domain and add it to our Cloudflare account. This is essential because Cloudflare Tunnel works by associating your tunnel with a domain or subdomain, which will serve as the public endpoint for accessing your Hashtopolis server securely.
Simply press the “Add domain” button in the Cloudflare Account Home menu and follow the setup wizard to configure your new domain.
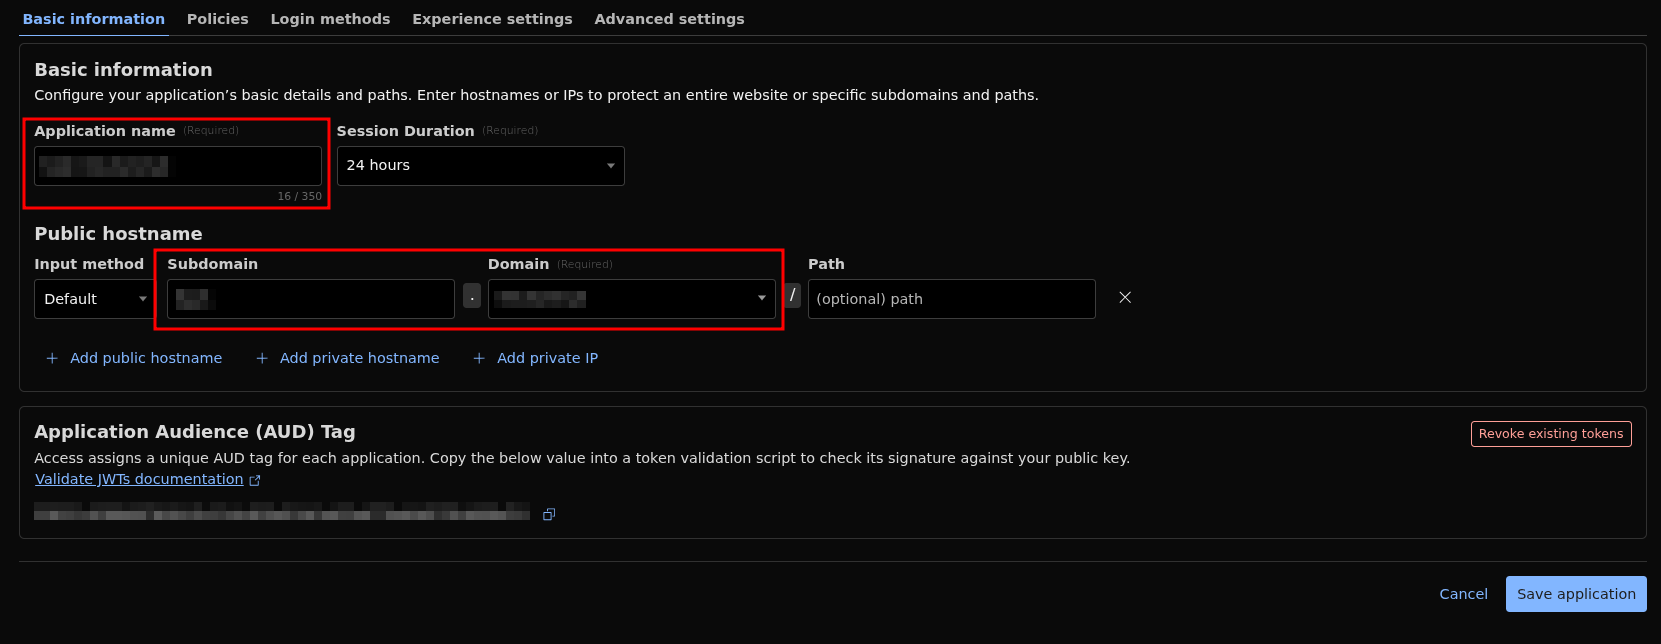
Second, we need to configure the Application. To do this, first activate the free Zero Trust plan from the Cloudflare dashboard. Then, navigate to Access > Applications, and add a new Self-Hosted Application.
Next, type a name for your application, enter your domain, and choose a subdomain — this can be anything you like. The full address (subdomain + domain) will be the URL used to access your Hashtopolis server through the tunnel.
Next, we set up a service token to use in our access policies. To do this, go to Access > Service Auth in the Cloudflare dashboard. Generate the token and make sure to securely save the two important HTTP headers: CF-Access-Client-Id and CF-Access-Client-Secret. These headers will be required to authenticate any requests sent through the tunnel, ensuring only authorized agents can communicate with the Hashtopolis server.
After that, move to the Policies tab and create a new policy. Give your policy a descriptive name, and set the Action to Service Auth. Then, under Rules, add an Include rule with the selector set to Any Access Service Token. Finally, save the policy. This setup ensures that only requests with valid service tokens can access your Hashtopolis server through the tunnel.

With our application set up and the policy applied, it’s time to create the tunnel. To do this, navigate to Networks > Tunnel in the Cloudflare dashboard.
Give your tunnel a name and follow the installation options provided. In our case, we selected the Debian environment, since we installed the cloudflared binary directly on the VPS where the Hashtopolis Docker container is running.
Next, go to the Public Hostnames tab and add your subdomain plus domain name. Choose the HTTP service type and set it to forward to localhost on port 8080, which is where your Hashtopolis Docker container is running.

With this setup, the Cloudflare Tunnel should be up and running as intended. You can test it by navigating to your subdomain in a browser, where you should see the following:
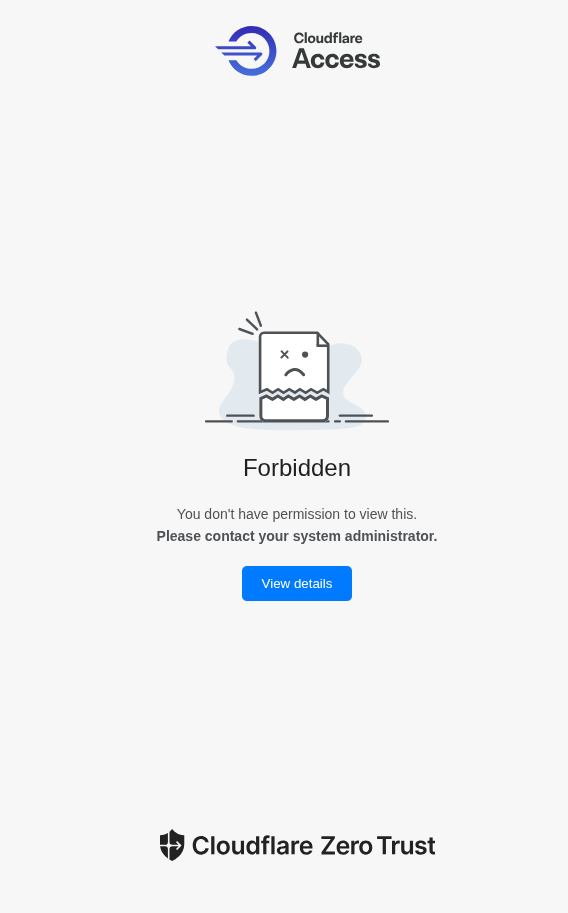
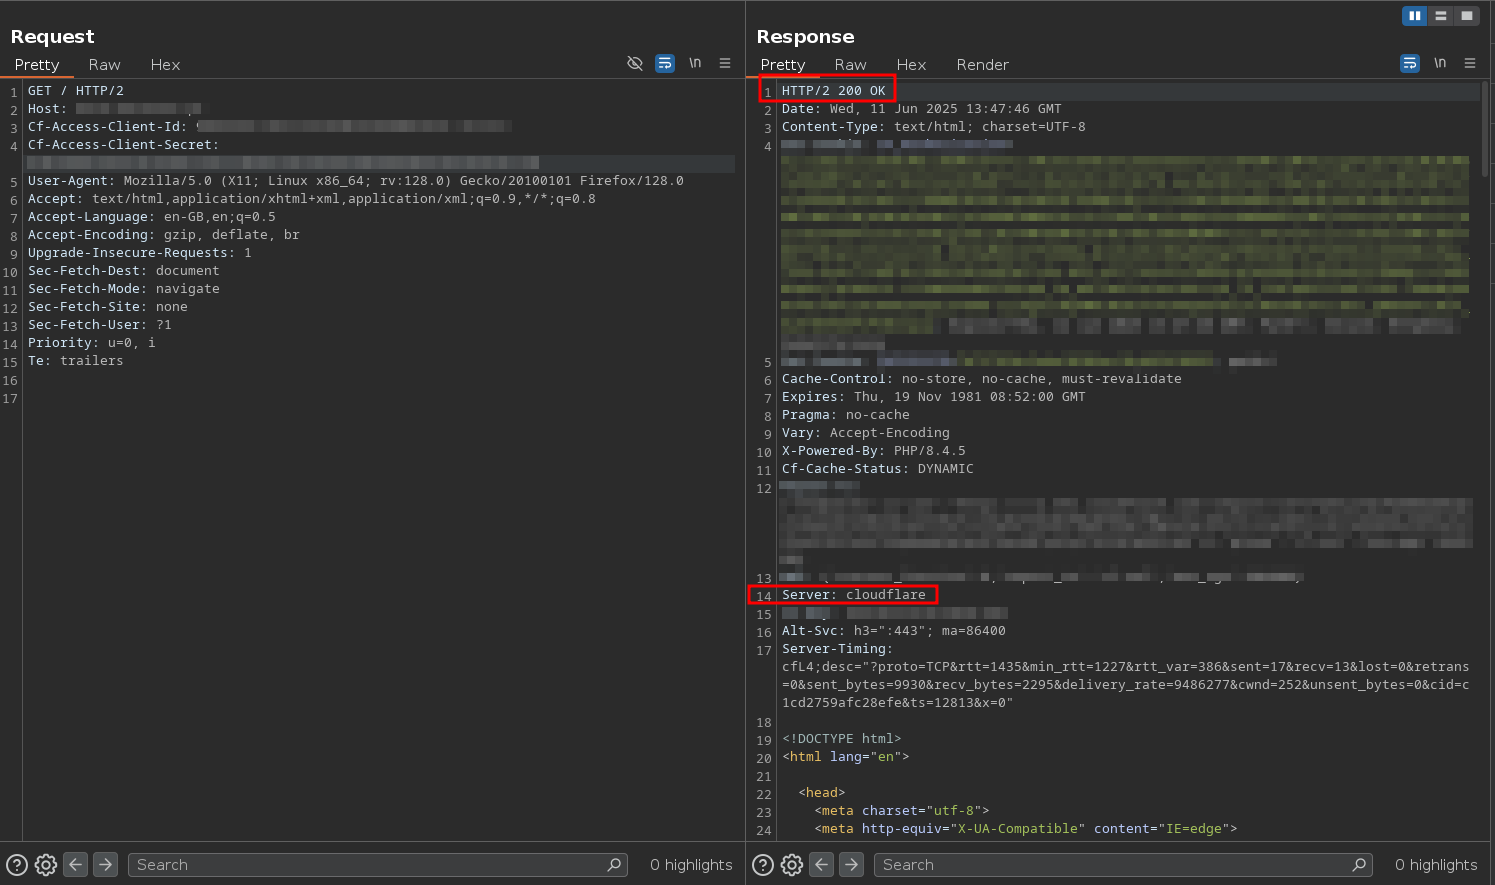
Seeing the “Forbidden” page is exactly what we want - it means our access policy is working. If you modify the request to include the special HTTP headers (CF-Access-Client-Id and CF-Access-Client-Secret), the tunnel authenticates you and lets you reach the Hashtopolis login form. This confirms that only requests with valid service tokens can access the server.
Customizing the Hashtopolis Agent for Secure Headers
Now that the Cloudflare Tunnel is configured and verified working, we needed to adapt the Hashtopolis Python agent to support custom HTTP headers. This change allows the Vast.ai agents to include the required CF-Access-Client-Id and CF-Access-Client-Secret headers when communicating with our Hashtopolis server through the Cloudflare Tunnel, ensuring secure and authenticated connections.
To meet this requirement, I forked the original Hashtopolis Python agent and modified it to support custom HTTP headers. I didn’t want to hardcode the Cloudflare-specific headers (CF-Access-Client-Id and CF-Access-Client-Secret), since other users might use different names or services. Instead, I implemented a command-line argument that allows users to define multiple custom HTTP headers. These headers are then automatically included in all outgoing requests from the agent, ensuring compatibility with secured endpoints like the one behind our Cloudflare Tunnel.
As a result, a new version of the Hashtopolis Python agent was created
Publishing a Custom Docker Image
In Vast.ai, we can create instances based on Docker containers. In the initial setup, I used this image, which includes the original Hashtopolis Python agent. However, since I needed support for custom HTTP headers, I decided not to use that version anymore. Instead, I created a new Docker image that uses my modified agent. You can find it here on Docker Hub: https://hub.docker.com/repository/docker/brunoteixeira1996/hashtopolis-hashcat-vast/general. This image is ready to run on Vast.ai and fully supports secure communication with the Hashtopolis server via Cloudflare Tunnel.
Deploying Scalable Agents on Vast.ai
To create a Vast.ai instance using our modified Hashtopolis agent, go to the Templates section and click New. Choose a name for your template, and in the Image Path, enter brunoteixeira1996/hashtopolis-hashcat-vast:latest. Set the Version Tag to latest.
For the Launch Mode, select Interactive shell server, SSH, which gives you control over the container once it starts.
Then, in the On-start script, enter the following to launch the agent with the required HTTP headers and connect it to your Hashtopolis server securely:
cd htpclient
python3 hashtopolis.zip --url  https://<YOUR DOMAIN>/api/server.php --voucher <YOUR VOUCHER> --http-headers 'CF-Access-Client-Id: REDACTED, CF-Access-Client-Secret: REDACTED'
Starting the crack
Now that everything is set up, it’s time to start the cracking process.
This blog post won’t cover how to upload wordlists or use Hashtopolis in depth, as it assumes you’re already familiar
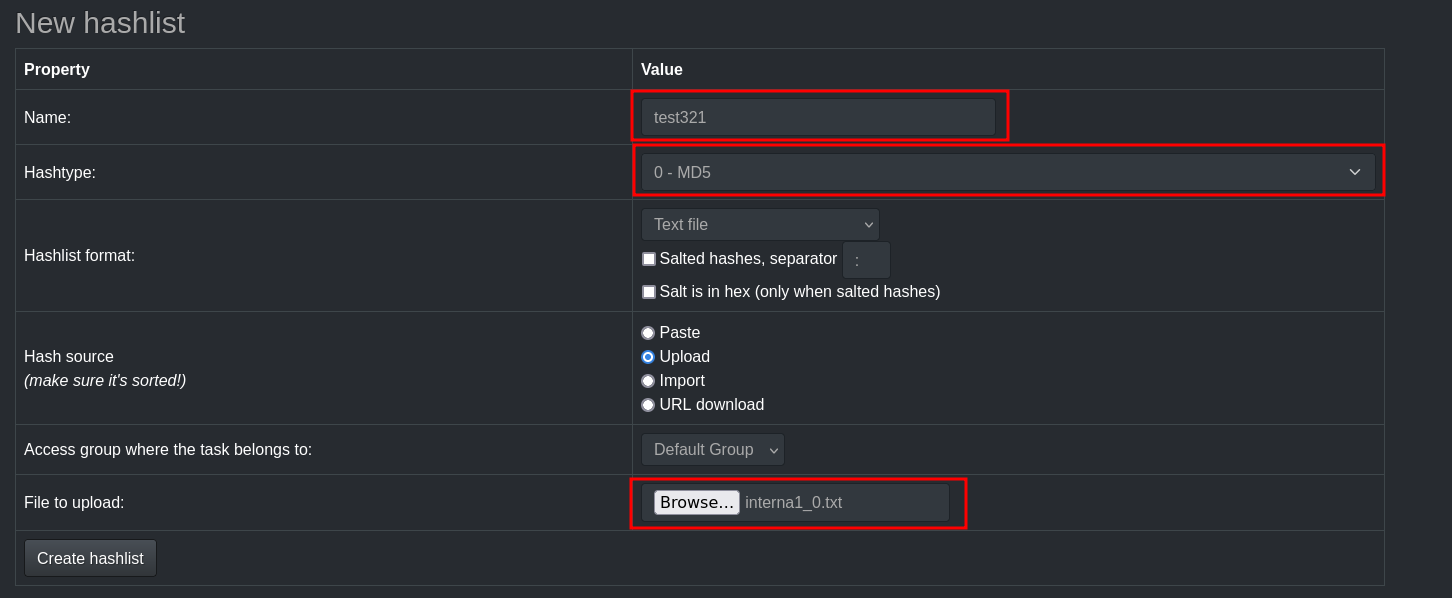
First, access your Hashtopolis server (you can SSH tunnel your VPS to access it locally via localhost). Then, navigate to Lists > New Hashlist. Here, enter a name for your hashlist, select the appropriate hash type, and upload your hashes.
Next, head over to Tasks > New Task. Enter a name for your task, select the hashlist you just created, and choose a dictionary (wordlist) of your choice to use for cracking.

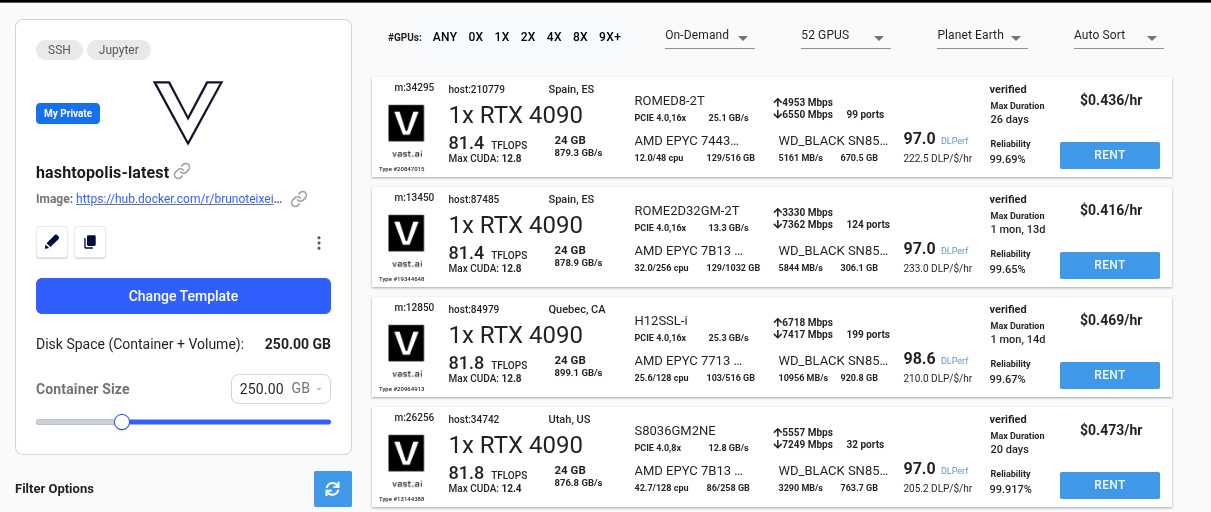
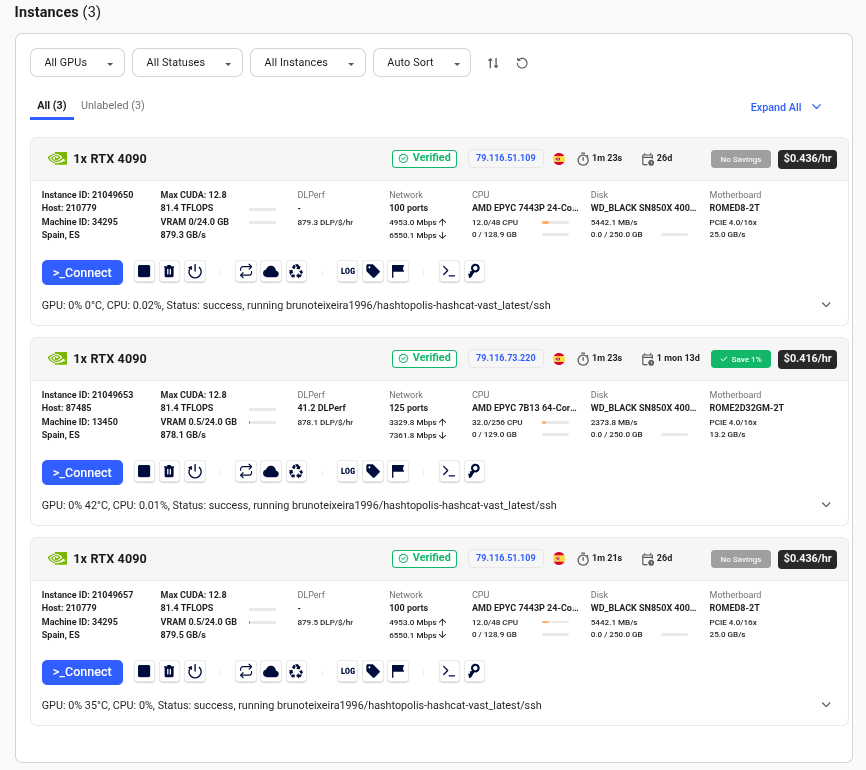
Now, navigate to Vast.ai > Instances and select from your available options. For this example, we’ll choose three RTX 4090 instances to maximize cracking power.
The startup and initialization process may take a few minutes—expect to wait at least 5 minutes. After that, check the Instances menu to confirm that all three instances are marked as ready to use.
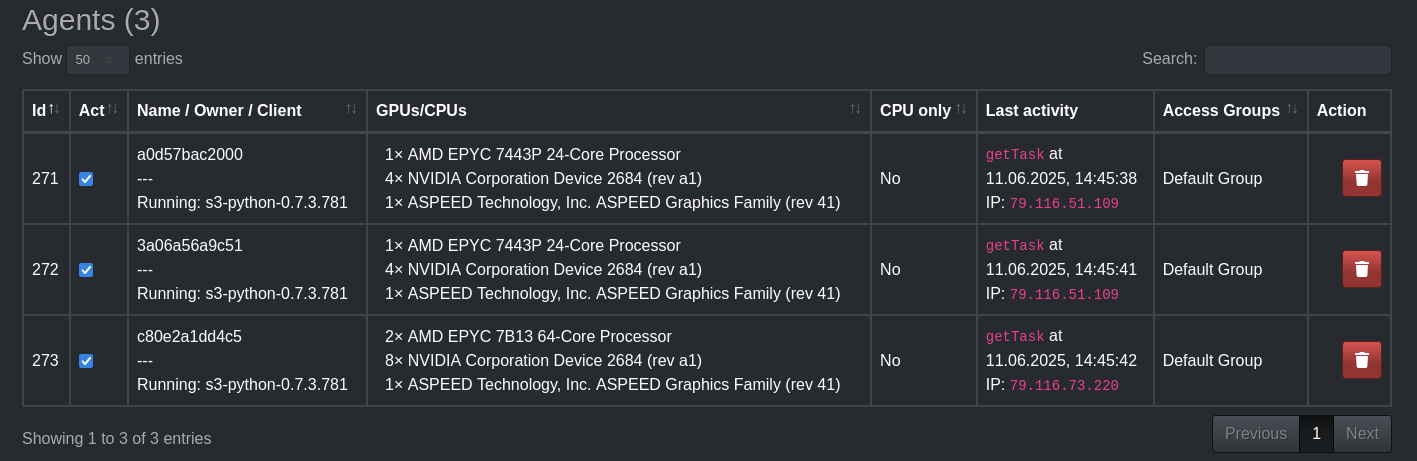
Next, go to your Hashtopolis dashboard and navigate to Agents > Show Agents. You should see all three agents listed and waiting to be assigned a task.
Select all agents, enable Trust agent with secret data, and assign them to the task you created earlier.
After a few minutes, you should see that the task has successfully completed and all the hashes have been cracked.
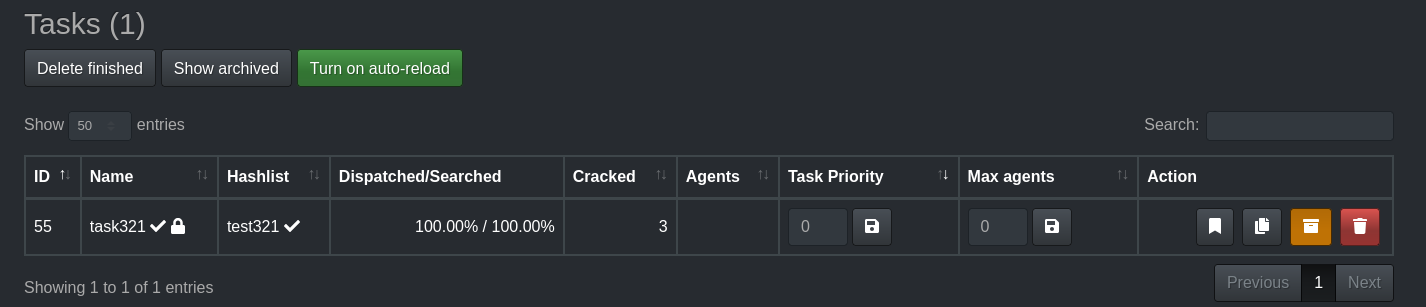
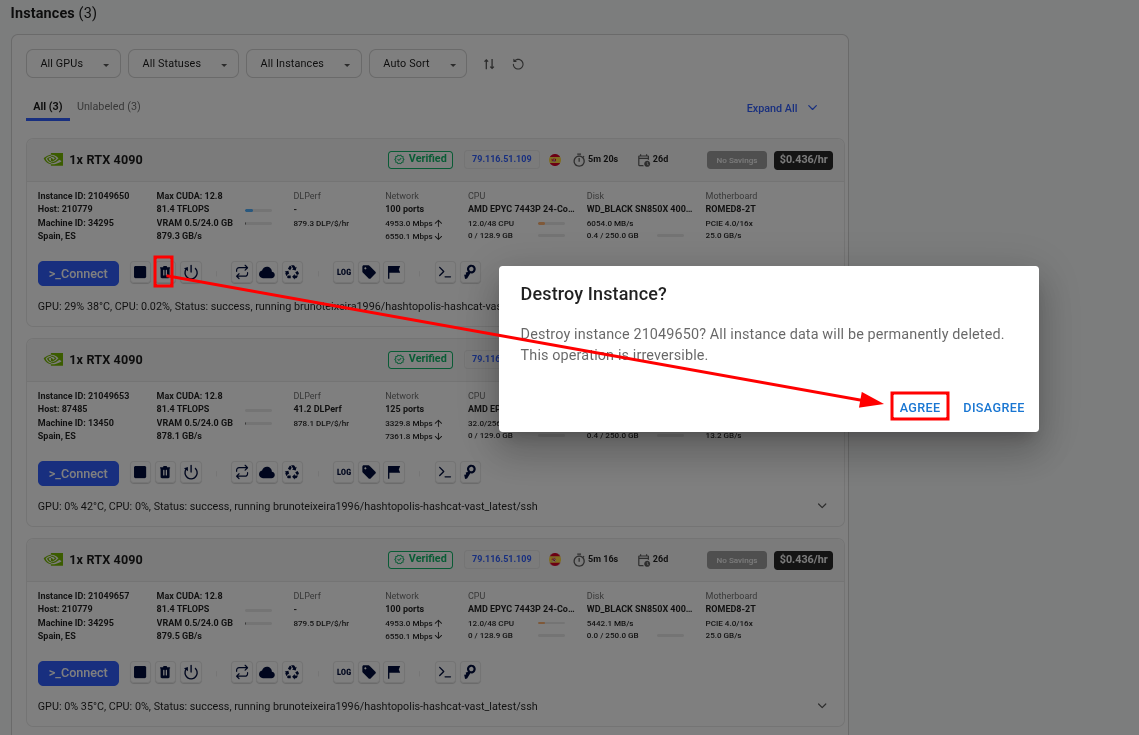
Once the task is complete, you no longer need the Vast.ai instances. Simply go to the Vast.ai console and manually delete the instances to avoid unnecessary charges.
Also don’t forget to remove the agents in the Hashtopolis server.
Conclusion
In this post, we walked through the evolution of a cost-effective and secure distributed cracking setup using Hashtopolis, Vast.ai, and Cloudflare Tunnel.
Starting from a simple but insecure public-facing deployment, we improved the architecture by introducing service token-based authentication and custom HTTP headers to lock down access. By adapting the Hashtopolis Python agent and containerizing it for Vast.ai, we achieved a scalable system where agents can be spun up on demand — all while keeping the Hashtopolis server protected behind a Cloudflare Zero Trust tunnel.
This approach not only reduces cost by avoiding idle GPU hardware but also improves flexibility and security, making it a solid foundation for similar distributed cracking or compute-heavy workloads.
That said, this entire process is currently manual: to start a new cracking job, you need to log into Vast.ai, rent a few instances, then create and assign tasks in Hashtopolis before kicking off the attack. However, this setup can be fully automated. For example, you could build a bot - like a Telegram bot - that receives a hash file, creates the corresponding task in Hashtopolis, provisions Vast.ai instances with predefined parameters, and launches the attack. This is just one example of the powerful automation opportunities enabled by this architecture.